Category Archives: Things We Like
Things We Like: Renovating Realities

Post by Kyle St. Romain.
Here on the Charles Rogers Blog, we often talk about remodeling and renovating projects. Following my own advice, I recently began a project to renovate the en suite bathroom in my loft. While this isn’t a bedroom renovation, to me, an en suite is a central element to any luxurious bedroom.
Having watched countless home improvement television shows throughout my life, I never fully appreciated the Hollywood-magic going on behind the scenes of these projects. On TV, renovations are deceptively easy, even if there are some unexpected hiccups along the way; this is not the case in real life. I’m quickly realizing that even relatively simple home improvement projects take a lot of time and coordination — even if the actual work runs smoothly. While I’m still not finished with the project, heck, it hasn’t really even started yet; I want to share with you some of my early experiences to give you a better idea of the process. I will post future updates as the project progresses.
Phase 1: Brainstorming
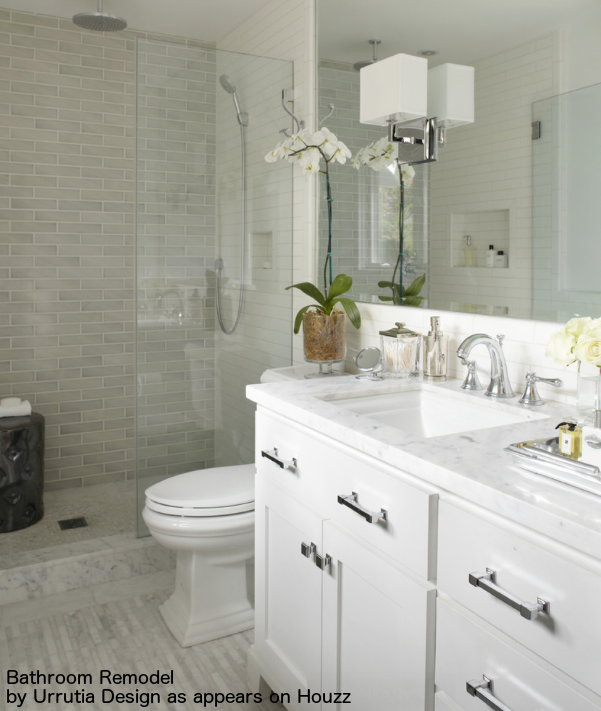
The brainstorming session for my renovation began with a couple hours browsing through the bathroom galleries on Houzz, which really is a great resource for gathering design inspiration. Armed with my idea book of modern bathrooms that I would like to have for myself, I started looking for an interior designer to help me develop a cohesive plan for my specific space. In fact, it turns out that the designer even recommended putting together an idea book as a starting point to give them a better idea of what I am looking to accomplish. Let’s not jump too far ahead though. Before you can start working with a designer, you have to find and hire one.
Phase 2: Finding A Designer
My initial thought was to hire an interior design student. I figured this would allow me to get more work for my money as a student would be much more motivated than a professional to knock it out of the park. What the student lacked in experience would be offset by the additional time they spent on the project and their motivation to start building a real portfolio. A short email conversation with my alma mater’s design school quickly put an end to that plan. However, I did get a couple of recommendations for graduates in the area who do freelance projects. Ultimately, my plan did pay off.
Phase 3: Meeting With The Designer
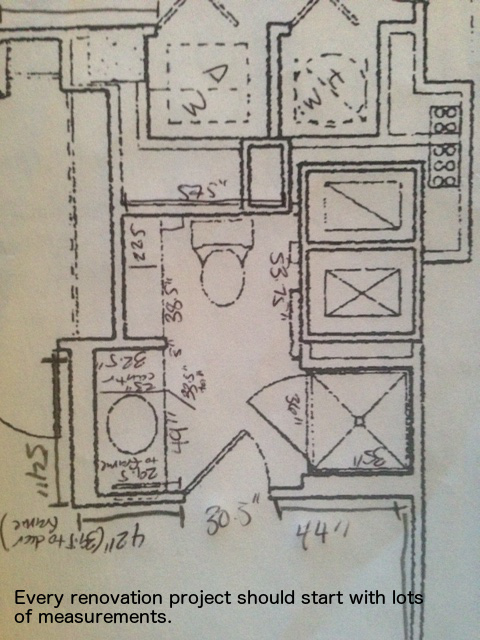
Having checked out several of the recommendations, I settled on an interior designer that I thought would be a good fit for my project. After several conversations discussing price and process, he came to my home for the initial consultation/estimate about a week later. About a week after our meeting, I was presented with a design package, complete with the elevations for a custom vanity, recommended fixtures, and an overall scope for the project. This couldn’t have gone any smoother, but it still took a couple weeks just to get a plan.
Phase 4: Finding A Contractor
Having discussed the plan and budget with the designer, we both agreed that it would be more cost effective to manage the project myself and break it out into smaller parts. Without having to pay the extra overhead for a general contractor, I hope to keep the overall cost of the renovations down. The problem is that in Fort Worth, many contractors don’t have a web presence. And since I don’t know of anyone who has done renovations in the past, I had no base for referrals. After a bit of research, however, I was able to come up with a list of companies that I thought would be a good match for what I am trying to do.

For my project I needed to find: (1) a tile layer/plumber; (2) a cabinet marker; (3) someone to build and install a barn door; and (4) a general carpenter/handyman who can handle everything else, including installing recessed lighting and relocating an overhead fixture.
The problem is that many of these companies seemed reluctant to just send out sales associates to estimate projects. Understandably, it costs them time and money to give these estimates, so they have to exercise some discretion. I solved this problem by visiting a couple companies in-person to discuss my plans and set up an appointment that way. While this really isn’t that big of a deal, it does add more time to the project. Further delaying the project is that once the contractor comes to the site, it takes them about another week to draw up an estimate for the project. I anticipate further delays in fitting my project into their existing schedules.
Next time you’re watching a home improvement show, notice how on TV all the plans are drawn up almost instantly, and there seems to be a whole construction company waiting for the green light. This is not the case in real life.
Moving Forward
Still waiting on a couple bids back from contractors, no real work has started yet. Once approved, the custom cabinets will take approximately 5 weeks to build, which I anticipate to be the biggest delay in the project. While I wish that things were moving along quicker, the extra time has given me the opportunity to refine the scope of my renovation. I’m always sure to ask for input from everyone who comes out to estimate the project; just to be sure nothing goes overlooked.
Even though I’m not making any major structural changes to my small en suite bathroom, the costs add up quickly. A couple fixtures, new cabinets, tile, labor, and a drain pan and frameless door for the shower are much more expensive than I anticipated. Hopefully this work will pay off, and I will keep you updated about the progress of this project as it unfolds.
Things We Like: Sleeping In Total Darkness

Post by Kyle St. Romain
In previous articles, we’ve discussed the three basic ingredients for a good night’s sleep: (1) a dark room; (2) a cold room; and (3) a luxurious bed. There are some other things you can do that will help you sleep more restfully, like: getting enough exercise, eating the right foods, and even wearing a pair of socks to bed, but a comfortable bed in a cold, dark room are the pillars of good sleep.
Unfortunately in today’s world, many people sleep in relatively light rooms. Some people even sleep with the television set on — something I do not understand. But even if you’re able to fall asleep in a lit room or actually prefer it, chances are you’re not getting the best night’s sleep you could. So today we’re going to discuss exactly why total darkness is a must-have for your mind and body to rest properly.
Darkness was probably something our ancestors took for granted (read: feared). With no electricity or artificial lights, early humans lived by the natural cycles of day and night — the key word being natural. With the advent of fire we started to become masters over our domain. Fast forward to present time and it’s all but impossible to find total darkness outside unless you’re camping somewhere remote. This is especially true for those of us who live in urban environments where almost every street is laden with artificial lights — lights that are considerably brighter than what we would otherwise be exposed to at night (the moon and stars).

In darkness, our brains are wired to produce melatonin, a hormone that helps lower blood pressure, glucose, and body temperature. The production of melatonin is one of the most important physiological responses that helps us sleep better. When melatonin production is suppressed, we start to go into sleep debt, which can cause fat gain, insulin resistance, and inflammation.
When we are exposed to light before going to sleep, however dim, our bodies’ natural rhythm gets thrown out of whack. Making matters worse is that many light bulbs, computer screens, and smartphones emit blue light, one of the most stimulating colors of light. Exposure to blue light from a computer screen is why it’s harder to fall asleep quickly after responding to those late night emails.
If you’re struggling with overexposure before bed, here are some helpful tips for eliminating light before sleep:
- Blackout curtains are an easy way to keep unwanted light from coming through your windows.
- Get rid of electronics in the bedroom. All those little power indicators can create quite a bit of light in an otherwise dark room. Clock radios, televisions, computer screens, and other gadgets are common sources of light in the bedroom. Even if these devices are not emitting light, their electrical currents can still disrupt your sleep pattern, so get them out of the bedroom.
- Color shift your computer screen. Working late is a fact of life for many of us, but if you have to be on the computer after sundown, you should at least try to minimize the damage. Having used the program f.lux for a number of years, it now hurts my eyes to look at a “regular” screen at night. This is something I cannot recommend enough.
So next time you’re having trouble going to sleep, think about how much light you were exposed to right before bed. You may find that a little less light is just what your body needs to get out of sleep debt.
Things We Like: Four-Poster Beds

Post by Kyle St. Romain.
Throughout history beds have been used as a symbol of wealth – the more ornate and grand the bed, the wealthier its owner. Early in the evolution of the bed, anything raised from the floor was thought to be luxurious enough. After all, it beat sleeping on the floor! In the 13th century, however, the idea of a bedchamber was becoming more popular, i.e., enclosing the sleeping area with fabrics. The earliest bedchambers suspended fabrics from the ceiling to create a private sleeping environment. This concept later evolved into a four-poster bed, thought to have first been used in Austria, which created a more luxurious look and feel. Featherbeds, woolen blankets, and silk sheets were also introduced around this time, which made the beds functional and beautiful.
As trade and craftsmanship continued to grow, so did the bed. No longer a raised assemblage of wooden planks, beds had become works of art intricately carved, gilded with gold, and adorned with fine fabrics and precious stones. Four-poster beds were also quite large, with the Great Bed of Ware (which can be seen at the Victoria and Albert Museum) measuring a full 11 feet square. A bed of that size will make you second-guess whether a California King is really big enough!

The traditional four-poster bed would have been made from thick oak posts (up to 18 inches in diameter in some of the grandest examples), attached to the floor (not the bed), and connected by a series of rails along the top. Today, the posts of four-poster beds are usually connected to the bed itself, and come in almost every style imaginable — limited only by your taste and budget.
If you’re considering a four-poster bed, Charles Rogers makes a couple different styles of canopy beds made out of iron that can be draped in fabrics to create a very luxurious look. You can also check out the Houzz gallery to see how other people have dressed up their four-poster beds.
Things We Like: New Year’s Resolutions For A Better Night’s Sleep

Post by Kyle St. Romain.
I hope that you all had a very Merry Christmas and a Happy New Year! It seems like 2013 flew by towards the end there, and now we’re on to 2014: a new year filled with boundless possibilities and opportunities. That is, of course, until 2015…
Given that the tradition of making resolutions is as old as celebrating the New Year itself, I wanted to share with you a handful of my favorite tips that you can use towards fulfilling a resolution to get a better night’s sleep.
- Exercise. Probably the most popular New Year’s resolution is to exercise — even if the effort rarely lasts through February. In addition to exercising for a fitness goal this year, try exercising for better sleep. You’ll still have a chance at fitting in that favorite pair of jeans you wore back in college, and will definitely sleep better.
- Color-shift your computer screen. I’ve written in the past about the benefits of color-shifting your computer screen using a free and lightweight program called f.lux. Without going into too much detail, color-shifting turns your screen from a bright white to a warm red as the sun goes down. The warmer light is easier on your eyes, and also helps prepare you for sleep (light is a stimulus that tells your brain to stay awake). I’ve been using the program for a couple years now and can’t imagine life without it.
- Eat a light snack before bed. While you don’t want to eat a large meal and immediately go to sleep (it would be bad for your digestion), a light snack about an hour before bed can help you sleep soundly through the night. The best snacks are those with a mix of tryptophan (the amino acid found in turkey that we blame for Thanksgiving drowsiness) and complex carbs. A great sleep snack that’s easy to make is peanut butter and crackers. The carbs from the crackers mixed with the tryptophan found in peanut butter helps your brain create serotonin, which helps you feel more relaxed and ready to sleep.
- Get in a routine. Setting a regular bedtime routine can help you sleep better. Easier said than done, I know. In addition to the time you go to bed, there are other nightly rituals that can also help prepare you for sleep. For example, some people find that taking a hot shower or meditating right before bed helps them sleep better. When developing a sleep routine, don’t neglect the other half, i.e., waking up, which is just as important as your bedtime.
- Make your bedroom your sanctuary. The Charles P Rogers blog is filled with tips and tricks for making your bedroom the sanctuary of your dreams. So if you’re looking for design inspiration, don’t be shy about browsing through the archives. Whatever your style, however, a luxurious bed is critical to getting a good night’s sleep and looks great in any décor. Without one you’ll always be missing something in the sleep department. 2014 is a perfect excuse to treat yourself to the comfortable bed you’ve always wanted.
While you may not have thought to make your New Year’s resolution “getting a better night’s sleep,” the above tips are general enough that you may have already resolved to do one of them. Now you have yet another reason to stick to your goals and make 2014 the best year yet!

Things We Like: 5 Tips For Taking Great Interior Photos

Post by Kyle St. Romain.
Whether you’re getting your home ready to sell, collecting before and after photos of your next design project, or are just having fun we all want our photos to come out as best they can. To help you with this, I’ve put together a list of five tips to help ensure your interior photos come out looking great.
1. Preparation is Key
Before you snap the first photo (unless you want to show a before and after comparison), you will need to prepare your room for the shoot. Start by getting rid of clutter, and do a bit of cleaning. When going through your space, keep in mind that everything in the photo should have a purpose. If something is not adding to the composition, feel, or effect of the photo then you need to get rid of it. This is also a good time to start envisioning how you want to capture your room.
2. Staging for success
Most of those gorgeous interiors you see online are staged, meaning the rooms are dressed up specifically for the occasion. If you’ve never staged a room before, it’s easiest to start off in the bedroom. Since the focal point of any bedroom is the bed, you’ll want to make it appear luxurious and inviting. A bed made with a matching set of sheets will help you create a more coordinated look. Mirrors are also great for bringing in more light into the bedroom, and can help make smaller rooms appear more open. Remember that since one corner of the room will always be out of the photograph you don’t need to furnish the entire room — you only need to create the illusion that it is. Let the viewer’s imagination fill in the rest.

3. Learn how to use your camera
Unless you take a lot of pictures, you should probably spend some time learning about the features of your camera. Automatic settings can do in a pinch, but ultimately limit the creative control you have over the picture. Manual settings like aperture, iso, and shutter speed can be intimidating, but are easy to become familiar with, especially using digital film. And with a plethora of online resources available to you, there’s no reason not to utilize some of the more advanced features of your camera.
4. Wide Angle Lens
To capture as much of the room as possible, you’ll need to use a wide-angle lens (which has a similar effect of zooming out on a point and shoot camera). The sweet spot for interior photography is generally somewhere between 16mm and 24mm; however, some people prefer a longer lens as they feel the wide-angle perspective distorts the room. If you don’t have a wide-angle lens, you can always rent or borrow one from a friend.
Something to be aware of is that most entry-level DSLRs have a crop sensor, which multiplies the focal length of the lens by 1.5 for Nikon cameras and 1.6 for Canon cameras. This means that to create a focal length of 16mm with a crop sensor camera, you’ll need to use a 10mm lens.
5. Have fun!
The most important part of taking great interior photos is to have fun! The more fun you have, the better your pictures are likely to turn out. Great photos can help you show off the beauty of your space and capture the imagination of the viewer. A weekend session can be a great excuse to spruce up your home and hone your interior photography skills.

